Notice: Function _load_textdomain_just_in_time was called incorrectly. Translation loading for the twentytwenty domain was triggered too early. This is usually an indicator for some code in the plugin or theme running too early. Translations should be loaded at the init action or later. Please see Debugging in WordPress for more information. (This message was added in version 6.7.0.) in C:\inetpub\wwwroot\blogs\wp-includes\functions.php on line 6121
Aryan – Club TechKnowHow!
Categories
C++ Installation & Configuration Programming Qemu Tools & Platforms

Serial Port for emulated esp32 using QEMU(?)

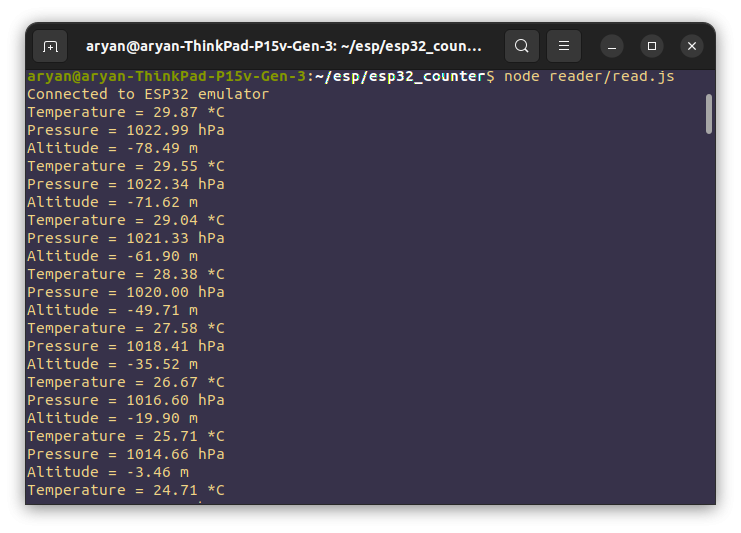
Previous posts walk through how to run code on an esp32 emulator using QEMU and how to create virtualized sensors for esp32 emulator. This post explains how you can set this up in a way that external applications such as c++/python/nodejs apps can read data from the esp32 emulator.

Building IoT controllers and dashboards requires the ability of the app to be able to read data from the SerialPort. This becomes tricky when using emulators – not only you will need the emulator to process data like the real hardware, you will also need to make sure the emulator and software are able to integrate and communicate.

When working with hardware you would print data over the serial port using something like Serial.println(data); and read it in JS using something like

const { SerialPort } = require('serialport');

const port = new SerialPort({
  path: '/dev/ttyUSB0', 
  baudRate: 9600,        
});

port.on('open', () => {
  console.log('Serial port opened');
});

port.on('data', (data) => {
  console.log('Received:', data.toString());
});

port.on('error', (err) => {
  console.error('Serial port error:', err.message);
});

Now how would we do this with an emulator running on QEMU?

Modify QEMU command – Update your QEMU command to expose the serial port via TCP. This makes QEMU listen on TCP port 1234 for serial connections.

qemu-system-xtensa -nographic -machine esp32 \
    -drive file=flash_image.bin,if=mtd,format=raw \
    -serial tcp::1234,server,nowait

Create a Node.js script to read from the TCP port:

const net = require('net');

const client = net.createConnection({ port: 1234 }, () => {
    console.log('Connected to ESP32 emulator');
});

client.on('data', (data) => {
    console.log(data.toString());
});

client.on('error', (err) => {
    console.error('Connection error:', err);
});

client.on('close', () => {
    console.log('Connection closed');
});

now you should be able to run node reader/read.js to get the data being printed on the serial port.


Code to this project can be found on this GitHub repo. This is part 3 of a project of me trying to develop a tool which will make it much easier for developing softwares which need to be integrated with embedded devices.

Categories
C++ Compilers & Frameworks Installation & Configuration Programming Tools & Platforms XAMPP

Virtualized sensors for esp32 emulator

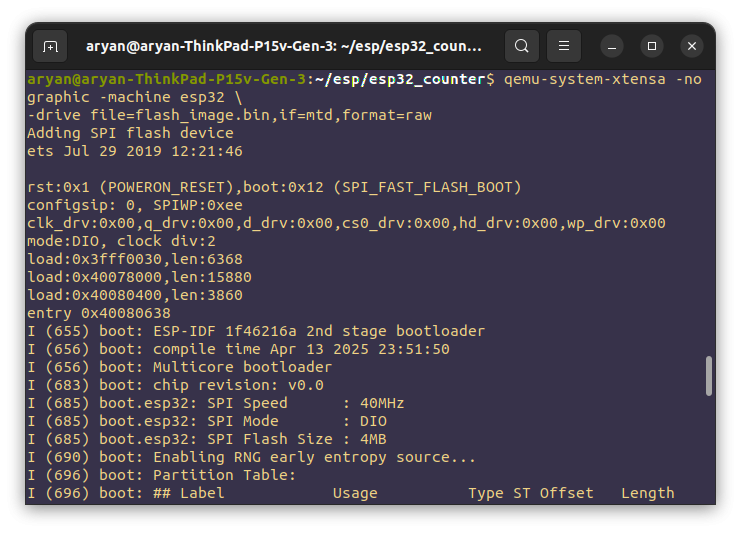
Okay so you’ve got your esp32 emulator running on qemu. What next? I need to virtualize sensors. That cannot be done really because sensors return environmental parameters, so you can either simulate environmental parameters or generate mock data instead.

For context I would suggest to read the previous post. I started off simple trying to generate mock data for the bmp280 sensor. Now to have your firmware behave with the virtualized sensor to be exactly like the real sensor you would have to create a new c++ library with the same classes, interfaces, and functions which take in the same parameters, and give out the same outputs so that there are no problems in migrating from testing it on real hardware and the emulator. The goal is to be able to run the same code on the emulator without changing it.

For this the most appropriate way would be to find the source code for the c++ library of the sensor that you would be using. In my case that would be the Adafruit_BMP280.h and replicate it entirely, replacing the data it returns from the real hardware with any data you’d like.

You can save a lot of time by just implementing a couple of commonly used functions that you are using in your code. A lot of these libraries are pretty big and repeating this for every library would be very time consuming.

Here is what i did

// utils/sensors/bmp280.hpp

#ifndef BMP280_HPP
#define BMP280_HPP

#include <stdbool.h>
#include "freertos/FreeRTOS.h"
#include "freertos/task.h"

#ifdef __cplusplus
extern "C" {
#endif

class bmp280 {
public:
    bmp280();
    bool begin(uint8_t addr = 0x77, uint8_t chipid = 0x58); 
    void bmp280_init(); 
    float readPressure(); 
    float readTemperature(); 
    float readAltitude(float seaLevelhPa = 1013.25); 
};

#ifdef __cplusplus
}
#endif

#endif
// utils/sensors/bmp280.cpp

#include "bmp280.hpp"
#include <math.h>
#include <stdio.h>

static float time = 0.0;

bmp280::bmp280() {}

bool bmp280::begin(uint8_t addr, uint8_t chipid) {
    vTaskDelay(pdMS_TO_TICKS(200)); 
    return true;
}

void bmp280::bmp280_init() {
    printf("BMP280 Initialized\n");
}

float bmp280::readPressure() {
    float pressure = 1013.25 + 10 * sin(time);
    time += 0.1; 
    return pressure;
}

float bmp280::readTemperature() {
    float temperature = 25.0 + 5 * sin(time);
    return temperature;
}

float bmp280::readAltitude(float seaLevelhPa) {
    float altitude = 44330 * (1 - pow(readPressure() / seaLevelhPa, 0.1903));
    return altitude;
}

And this can be used in your main/main.cpp like so

// main/main.cpp

#include <stdio.h>
#include "freertos/FreeRTOS.h"
#include "freertos/task.h"
#include "bmp280.hpp"

extern "C" void app_main() {
    bmp280 bmp;

    if (!bmp.begin()) {
        printf("Failed to initialize BMP280\n");
        return;
    }
    printf("BMP280 Ready!\n");

    while (1) {
        float temperature = bmp.readTemperature();
        printf("Temperature = %.2f *C\n", temperature);

        float pressure = bmp.readPressure();
        printf("Pressure = %.2f hPa\n", pressure);

        float altitude = bmp.readAltitude();
        printf("Altitude = %.2f m\n", altitude);

        vTaskDelay(1000 / portTICK_PERIOD_MS);
    }
}

Be sure to add the dependancies in main/CMakeLists.txtlike so

idf_component_register(SRCS "main.cpp" "../utils/sensors/bmp280.cpp"
INCLUDE_DIRS "../utils/sensors/")

This is a very simple demonstation which is actually very intuitive. I plan on creating libraries like such for all the sensors and data storage modules I will be needing. Then the plan is to figure out a way to write tests and have the data returned by these sensor libraries to main/main.cpp based on the tests.

So I would be able to write the tests once which would include multiple scenarios and edge cases and just run a command to see if the firmware I have written passes the test cases on the emulator itself without actually going and performing the tests with the real hardware – saving me a lot of time.

Categories
Compilers & Frameworks Installation & Configuration Qemu Tools & Platforms

esp32 on QEMU

Not having the entire hardware for embedded projects is a pain. It stops the development entirely and is extremely inefficient. In traditional software dev – development, testing and deployment are 3 entirely different phases which are mostly independant of each other. Eventhough software development methodologies such as iterative development, agile development, rapid prototyping exist however the waterfall model is intuitive and is commonly used while building projects.

Embedded development (atleast for non-industry grade projects) requires development and testing to happen side by side to ensure what you’re building works!

Now you cannot really always have the hardware on hand, which makes development tricky. We faced a similar problem during the development of our flight software for our newest rocket Airavata at Team Sammard. The development timelines of the flight computer and flight software run paralelly which means for a majority chunk of the time we do not have access to the hardware on which our code will run.

This means we can write our code but not really test it. I took this to reddit to search for solutions where I was suggested to simply buy the components and make the flight computer on a breadboard and be done with it. One can argue that the components do not cost that much to begin with and buying them to save time would make sense.

However since I come from a pure software background I wanted a solution which not only solved my current problem but also gave me more.

The Plan!

So the plan was to create a custom flight computer emulator, which would behave exactly how the real flight computer would behave. This means that not only the microcontroller will be virtualized but also the sensors, storage, actuators, etc.

In theory since we are virtualizing the sensors we can have them return any data we’d like which means we can write tests and ahve the sensors return data based on the tests which will allow us to see how oour flight software is performing in those situations.

This particular approach is better than building the flight computer on a breadboard as here we can test the behaviour of the flight software in situations such as reaching the highest point in flight to check for parachute ejection. Which is a very risky test to perform with real hardware as it has the risk of damaging the hardware.

Prerequisites

`I will strongly recommend using Linux for this. Not that this is not possible on Windows but it is just far more easier on linux.

1. ESP-IDF

Our flight computer is powered by the esp32 by espressif. Run the following commands to isntall and setup ESP-IDF.

mkdir -p ~/esp
cd ~/esp
git clone --recursive https://github.com/espressif/esp-idf.git
cd esp-idf
./install.sh

This will install all necessary tools.

2. Set Up Environment Variables

Once the installation is complete, you need to load the environment variables:

source ~/esp/esp-idf/export.sh

Now try running:

idf.py --version

3. Make It Permanent

To avoid running source ~/esp/esp-idf/export.sh every time, add it to your shell configuration:

echo 'source ~/esp/esp-idf/export.sh' >> ~/.bashrc

Then restart your terminal and check again.

4. Install Required Dependancies

Before installing QEMU, install the necessary system libraries:

sudo apt-get install -y libgcrypt20 libglib2.0-0 libpixman-1-0 libsdl2-2.0-0 libslirp0

2. Install the ESP32 QEMU Emulator

Run the following command to install the pre-built QEMU binaries:

python $IDF_PATH/tools/idf_tools.py install qemu-xtensa qemu-riscv32

If $IDF_PATH is not set, try:

python ~/esp/esp-idf/tools/idf_tools.py install qemu-xtensa qemu-riscv32

After installation, make sure QEMU is added to your PATH:

source ~/esp/esp-idf/export.sh

To verify, check the installed tools:

python $IDF_PATH/tools/idf_tools.py list

You should see qemu-xtensa and qemu-riscv32 in the list.

Run a Sample ESP32 Application in QEMU

Now that QEMU is installed, let’s run a test application:

1. Create a New ESP-IDF Project

cd ~/esp
idf.py create-project hello_world
cd hello_world

2. Configure the Project for QEMU

idf.py set-target esp32

3. Write Sample Code

Replace the default main.c with the following code. Create or modify the file main/main.c:

#include <stdio.h> 
#include "freertos/FreeRTOS.h" 
#include "freertos/task.h" 

void hello_task(void *pvParameter) { 
    while(1) { 
        printf("Hello, World!\n"); 
        vTaskDelay(pdMS_TO_TICKS(1000)); // Wait for 1 second 
    } 
} 

void app_main() { 
    xTaskCreate(&hello_task, "hello_task", 2048, NULL, 1, NULL); 
}

4. Build the Project

Compile the project:

idf.py build

This will generate the required firmware files.

5. Run on QEMU

Merge binaries:

esptool.py --chip esp32 merge_bin -o flash_image.bin --flash_mode dio --flash_size 4MB \
    0x1000 build/bootloader/bootloader.bin \
    0x8000 build/partition_table/partition-table.bin \
    0x10000 build/esp32_counter.bin

Run in QEMU:\

qemu-system-xtensa -nographic -machine esp32 \
-drive file=flash_image.bin,if=mtd,format=raw

In case your flash_image.bin is less than 4.0MB you will have to run:

truncate -s 4M flash_image.bin

verify the size of flash_image.bin using:

ls -lh flash_image.bin

Then re-run using QEMU.

I am currently in the works of developing a custom emulator to test our flight software. The repository for which can be found here on GitHub. In case you’re interested in something similar or found this cool do drop a comment below.

Categories
C++ Projects

BitFlash_Client – Open Source FOTA for Everyone

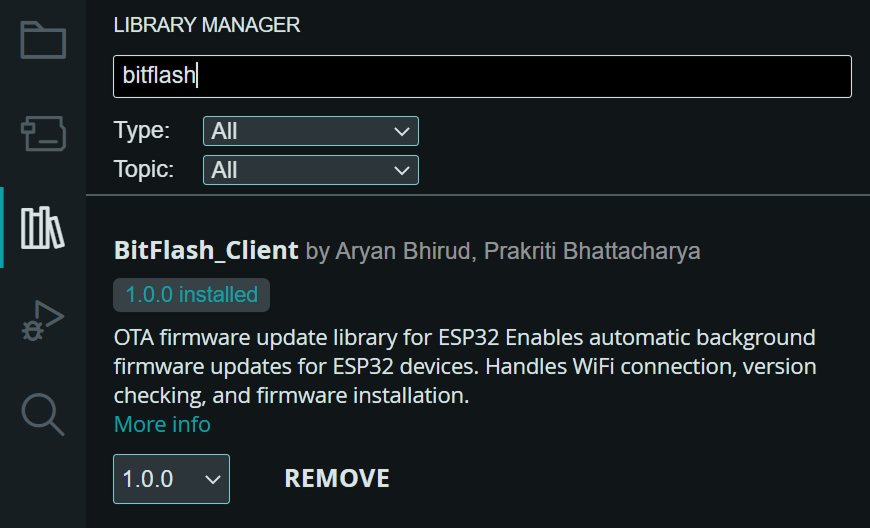
Last week Prakriti & I created BitFlash_Client which is now officially a part of the Arduino Library Registry. You can try out the library and let us know if you liked it and if you have any feedback we’d love to hear you out. Also if you’re interested in contributing to the project we’re up for that too (we are planning on continuing this project past the hackathon stage).

So what is BitFlash_Client?

BitFlash_Client allows embedded devices to check for firmware updates in the background and update and reboot themselves once a new firmware is detected. All this is done by checking a hosted .json file for new updates.

Flashing code again and again onto an embedded device is a pain and fellow IoT developers will agree that not only is it tiresome but when you’re working with a network of these devices and you have to change the firmware running on multiple devices it really just gets very very annoying.

What is FOTA?

FOTA – Firmware Over The Air is a technology is the underlying concept of BitFlash_Client which allows IoT devices to download new firmware and reflash the new firmware onto themselves wirelessly without human intervension. Mostly WiFi is used for downloading firmware updates as radio communication doesn’t have enough bandwidth to support firmware transfers in a realistic scenario.

What are the features of BitFlash_Client?

  1. All firmwares can be updated by a single git push as the binaries are hosted on the user’s github itself.
  2. You can deploy multiple firmwares at once.
  3. You can set the delay between 2 consecutive checks for new firmware.

BitFlash_Client started out as a hackathon project and for testing and deployment we needed to see if the embedded device (in our case an ESP32) was able to check for updates on a hosted .json file, if yes then the .json file would point towards the url from where the device could download the binary for the firmware.

Now this means 2 things need to be hosted here:

  1. .json file – where you will check for the version of the firmware
  2. .bin file – from where you will download the firmware

Since this is a solution targets at making things simpler we decided to offer a combined solution – An electronjs app for managing and monitoring the devices, a webserver hosting the .json file, and BitFlash_Client.

We were struck with one question – where to host the compiled binaries?

Because if we we’re to host them on the same server as the .json file it would mean we would first have to bring the binaries from the user’s github repository after every git push. This seemed too complicated of a solution which we wouldn’t have time to complete so we opted for a cheeky solution – let the binaries be hosted on the user’s github itself and simply point to the repo from the .json file.

Not only did this save us a lot of time but also made sure that binaries would be instantly available as soon as a git push was performed.

So what’s left?

Unfortunately we were unable to finish all the features we had planned out but we are going to finish them soon.

  1. Perform shell scripting in the electronjs app to compile all binaries from code automatically.
  2. Minor bug fixes in BitFlash_Client
  3. Configure github auth to allow private repo access.
Categories
Installation & Configuration Tools & Platforms

Setting Up HTTPS on IIS in 2024

Hosting websites on a windows server using the IIS – Internet Information Services is painful in 2024 for a new developer. The technology is so old that people who know how to use this are very proficient in it and the documentation is very limited and assumes you know a lot of the stuff beforehand which makes it difficult for new developers like me to actually get the stuff working without hitting a roadblock. One such issue is setting up https for your website by binding your SSL certificates.

SSL certificates prove that the website you’re connecting to genuinely owns the registered domain name, helping ensure secure, encrypted communication between the user and the correct server.

When my previous SSL certificate expired I went and bought the same SSL i had earlier without skipping a beat. But you might want to deciede what type of SSL certificate you should purchase based on your future requirements. The most common options are:

  • Single-Domain SSL: Secures a single domain (e.g., techknowhow.club).
  • Wildcard SSL: Secures a domain and all its subdomains (e.g., *.techknowhow.club).
  • Multi-Domain (SAN) SSL: Secures multiple specified domains or subdomains in one certificate.

I did not plan on this which is why i ran into a problem shortly after setting up the SSL for techknowhow.club.

Let us try understanding how to actually do this now. Firstly we need to generate a CSR code on our IIS server which will be used to create the SSL certificate. You can create the SSL certificate by generating a CSR code from the SSL provider directly also but i would not recommend that approach.

Generating CSR code on iis server

You need to go to the server panel in your iis and go to server certificates. Create a Certificate Request from the top right panel.

Enter your details, select 2048 bits for the encryption and select the path where you want to create a certificate request and name the file.

On completion a .txt file will be created at the defined location whose contents look somewhat like this.

-----BEGIN CERTIFICATE REQUEST-----
.
.
.
.
.
.
.
-----END CERTIFICATE REQUEST-----

Copy the entire contents of this file and use this as the CSR code while creating the SSL certificate from any SSL provider like GoGetSSL or ZeroSSL.

Validate your SSL Certificate

Now your SSL certificate will be generated but you still need to validate that the domain name also belongs to you. There are multiple ways you can choose to validate this the easiest i find is to use the validate using DNS option.

Validate using create a DNS record

You will be provided a DNS record by the SSL provider which you need to create through the service which handles your domain/dns. For me its godaddy so i simply log on to godaddy and create a DNS record.

Generally you would have to create a DNS record of the type CNAME with the given target and host. You are not required to enter your domain name anywhere. Also feel free to keep a custom TTL (time to live) – i keep mine at 600 seconds which is the lowest godaddy allows.

Once this is done validate the DNS record from your SSL provider’s portal, and you should have your SSL certificate in minutes.

Installing the Certificate

Now add this certificate to the same path which you defined while creating the certificate request. Make sure you do not move the files around. I had the genius idea of organizing my old certificate files and new certificate files in 2 different folders after creating the certificate request which meant when i wanted to complete the certificate request my path wasnt the same – which caused iis to reject my certificate every time.

So the way this works is that when you create a certificate request through iis it creates:

  • CSR code
  • Private key

The private key is stored on the server and is associated with the CSR code and any request with the path and same CSR code.

Now we need to complete the certificate request for which you need to move your SSL certificate to the same folder with your CSR code and through iis – Complete Certificate Request. If the CSR code doesn’t match with the private key or the SSl does not match with the CSR code the certificate will be rejected.

Binding the SSL Certificate to your website

Now choose your website from the section on the left on iis and click on bindings. If you already have https bindings edit them or create a new binding using https make sure you select the same SSL certificate here which you have just created. I would recommend deleting the old certificates from iis to avoid confusion.

Simply restart your server once this is done and you should be good to go!

My Mistake

After configuring SSL for techknowhow.club i went and tried to add the same certificate for my subdomains like codeclip.techknowhow.club which is when i realised that you need a different type of SSL certificate altogether for this; and those are expensive. Another alternative to the expensive multidomain r wildcard SSL certificates would probably be to just buy another domain SSL certificate. This works only if you have only a few subdomains otherwise this would become more expensive than buying a multidomain or wildcard. Generally domain SSLs are cheaper than the other options. Another option is to use a free SSL certificate however those have a much shorter validity period of only 90 days. But they might just be a really good option for maybe a hackathon project or a capstone project.