TensorFlow Lite: Enhancing Mobile and Embedded Machine Learning
TensorFlow Lite stands at the forefront of deploying machine learning models on mobile and embedded devices, embodying Google’s cutting-edge adaptation of its broader TensorFlow framework. This lightweight, open-source solution enables machine learning functionalities to be efficiently executed on devices with limited computational power such as smartphones, tablets, and IoT devices.
By compressing TensorFlow models to run faster and require less space, TensorFlow Lite ensures that these applications maintain high accuracy without compromising performance. It supports diverse machine learning tasks directly on devices, which is crucial for applications needing rapid responses and robust offline capabilities. Additionally, TensorFlow Lite provides an array of pre-built models and customization tools, empowering developers to integrate sophisticated AI capabilities seamlessly. This initiative dramatically enhances user experiences, offering intelligent, responsive interactions across various devices.
Setting up the Environment
Requirements
Before starting, ensure you have the following:
- A Google account (for using Google Colab)
- Basic knowledge of Python and machine learning
- A dataset of images for object detection
Reason for using Google Colab
Google Colab offers a free environment with a GPU, perfect for training deep learning models. You get a GPU with 15 GB of RAM for free, which is usually expensive. This is great for training TensorFlow models, especially if you don’t need to train many models often. To start, open Google Colab and create a new notebook.
Gathering and Labeling Training Data
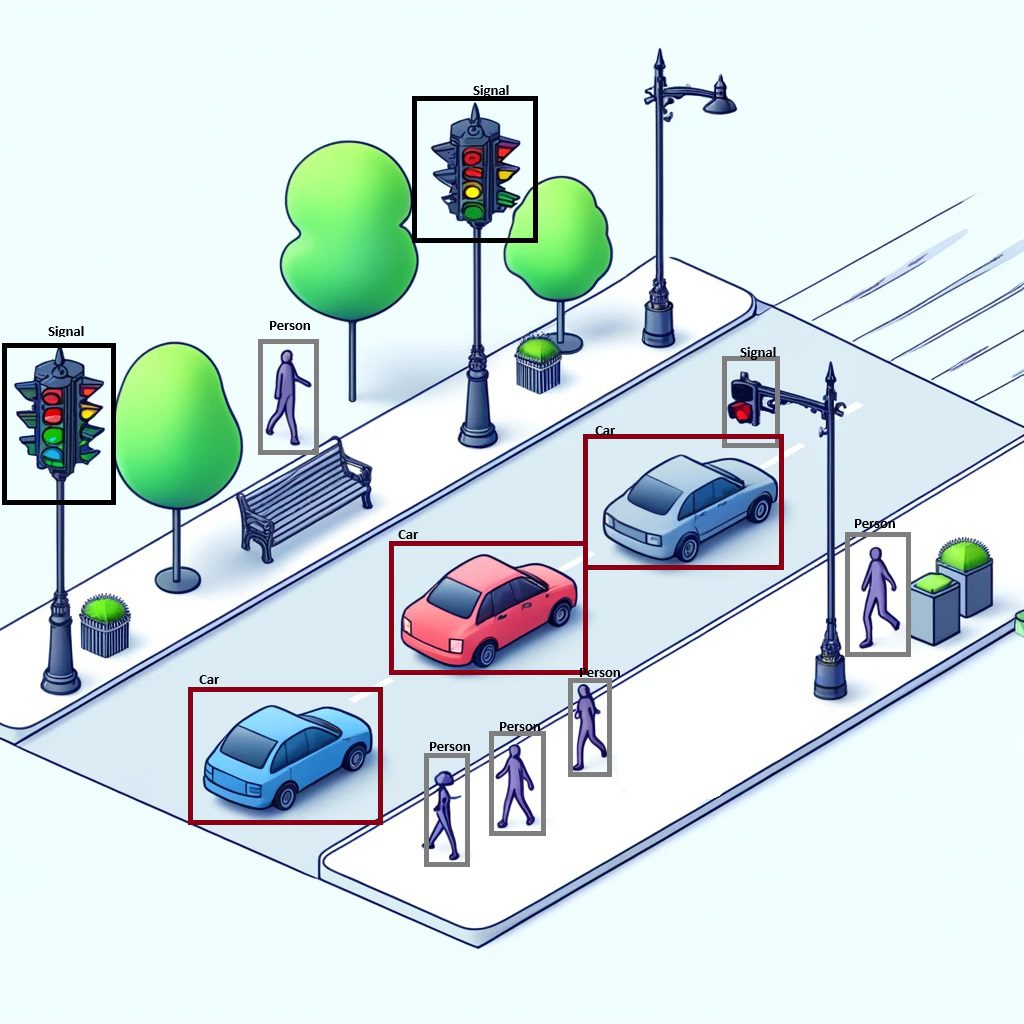
Gather a dataset of images that include the objects you want to detect. Aim for at least 1000 images with varied backgrounds and lighting conditions to have higher accuracy of prediction.
Labeling Images Using LabelImg
Use LabelImg to annotate the images. Each image should have an XML file containing the annotations in the PascalVOC format. Save these files in a folder named 'images'.
Installing TensorFlow Object Detection API
First, we’ll install the TensorFlow Object Detection API in this Google Colab instance. This requires cloning the TensorFlow models repository and running a couple installation commands.
# Clone the tensorflow models repository from GitHub
!pip uninstall Cython -y
!git clone --depth 1 https://github.com/tensorflow/models
Then execute the following commands
import re
with open('/content/models/research/object_detection/packages/tf2/setup.py') as f:
    s = f.read()
with open('/content/models/research/setup.py', 'w') as f:
    # Set fine_tune_checkpoint path
    s = re.sub('tf-models-official>=2.5.1', 'tf-models-official==2.8.0', s)
    f.write(s)
Configuring GPU for training
!pip install pyyaml==5.3 !pip install /content/models/research/
!pip install tensorflow==2.8.0

!pip install tensorflow_io==0.23.1

!wget https://developer.download.nvidia.com/compute/cuda/repos/ubuntu1804/x86_64/cuda-ubuntu1804.pin
!mv cuda-ubuntu1804.pin /etc/apt/preferences.d/cuda-repository-pin-600
!wget http://developer.download.nvidia.com/compute/cuda/11.0.2/local_installers/cuda-repo-ubuntu1804-11-0-local_11.0.2-450.51.05-1_amd64.deb
!dpkg -i cuda-repo-ubuntu1804-11-0-local_11.0.2-450.51.05-1_amd64.deb
!apt-key add /var/cuda-repo-ubuntu1804-11-0-local/7fa2af80.pub
!apt-get update && sudo apt-get install cuda-toolkit-11-0
!export LD_LIBRARY_PATH=/usr/local/cuda-11.0/lib64:$LD_LIBRARY_PATH
!python /content/models/research/object_detection/builders/model_builder_tf2_test.py
Expected Output
Running tests under Python 3.10.12: /usr/bin/python3
[ RUN ] ModelBuilderTF2Test.test_create_center_net_deepmac 2024-03-22 23:48:56.660438: W tensorflow/core/common_runtime/gpu/gpu_bfc_allocator.cc:39] Overriding allow_growth setting because the TF_FORCE_GPU_ALLOW_GROWTH environment variable is set. Original config value was 0. W0322 23:48:57.221283 134667806457856 model_builder.py:1112] Building experimental DeepMAC meta-arch. Some features may be omitted. INFO:tensorflow:time(__main__.ModelBuilderTF2Test.test_create_center_net_deepmac): 3.59s I0322 23:48:57.940035 134667806457856 test_util.py:2373] time(__main__.ModelBuilderTF2Test.test_create_center_net_deepmac): 3.59s
[ OK ] ModelBuilderTF2Test.test_create_center_net_deepmac
[ RUN ] ModelBuilderTF2Test.test_create_center_net_model0 (customize_head_params=True) INFO:tensorflow:time(__main__.ModelBuilderTF2Test.test_create_center_net_model0 (customize_head_params=True)): 1.16s I0322 23:48:59.095793 134667806457856 test_util.py:2373] time(__main__.ModelBuilderTF2Test.test_create_center_net_model0 (customize_head_params=True)): 1.16s
[ OK ] ModelBuilderTF2Test.test_create_center_net_model0 (customize_head_params=True) [ RUN ] ModelBuilderTF2Test.test_create_center_net_model1 (customize_head_params=False) INFO:tensorflow:time(__main__.ModelBuilderTF2Test.test_create_center_net_model1 (customize_head_params=False)): 0.49s I0322 23:48:59.584455 134667806457856 test_util.py:2373] time(__main__.ModelBuilderTF2Test.test_create_center_net_model1 (customize_head_params=False)): 0.49s
[ OK ] ModelBuilderTF2Test.test_create_center_net_model1 (customize_head_params=False)
[ RUN ] ModelBuilderTF2Test.test_create_center_net_model_from_keypoints INFO:tensorflow:time(__main__.ModelBuilderTF2Test.test_create_center_net_model_from_keypoints): 0.5s I0322 23:49:00.089346 134667806457856 test_util.py:2373] time(__main__.ModelBuilderTF2Test.test_create_center_net_model_from_keypoints): 0.5s
[ OK ] ModelBuilderTF2Test.test_create_center_net_model_from_keypoints
[ RUN ] ModelBuilderTF2Test.test_create_center_net_model_mobilenet INFO:tensorflow:time(__main__.ModelBuilderTF2Test.test_create_center_net_model_mobilenet): 4.25s I0322 23:49:04.342767 134667806457856 test_util.py:2373] time(__main__.ModelBuilderTF2Test.test_create_center_net_model_mobilenet): 4.25s
[ OK ] ModelBuilderTF2Test.test_create_center_net_model_mobilenet
[ RUN ] ModelBuilderTF2Test.test_create_experimental_model INFO:tensorflow:time(__main__.ModelBuilderTF2Test.test_create_experimental_model): 0.0s I0322 23:49:04.344451 134667806457856 test_util.py:2373] time(__main__.ModelBuilderTF2Test.test_create_experimental_model): 0.0s
.
.
more output
.
.
[ OK ] ModelBuilderTF2Test.test_unknown_meta_architecture
[ RUN ] ModelBuilderTF2Test.test_unknown_ssd_feature_extractor INFO:tensorflow:time(__main__.ModelBuilderTF2Test.test_unknown_ssd_feature_extractor): 0.0s I0322 23:49:30.352874 134667806457856 test_util.py:2373] time(__main__.ModelBuilderTF2Test.test_unknown_ssd_feature_extractor): 0.0s
[ OK ] ModelBuilderTF2Test.test_unknown_ssd_feature_extractor
----------------------------------------------------------------------
Ran 24 tests in 36.002s
OK (skipped=1)
Gather and Label Images
To prepare your system for image annotation, it is essential to first install Anaconda Prompt. Anaconda serves as a robust tool that simplifies package management and deployment, making it ideal for establishing environments for various tasks. Upon installing Anaconda, you can effortlessly install labelImg, a graphical image annotation tool. LabelImg enables efficient labeling of objects within images, which is crucial for training machine learning models. After installing labelImg via Anaconda, you can commence annotating your images by drawing bounding boxes around the objects of interest directly within the tool. This setup will streamline your preparation process for any image-based machine learning projects.Let’s get started with it.
Download Anaconda
Anaconda is a software system that helps manage and organize tools for data science and machine learning. It makes it easier to install and handle different programs and environments needed for scientific projects. Anaconda supports popular languages like Python and R, making it valuable for research and development tasks.
To download Anaconda, visit the Anaconda website, go to the Downloads section, and choose the installer for your operating system (Windows, macOS, Linux). Download the file, run the installer, follow the prompts to agree to the license and select the installation location if needed. Once installed, verify by opening Anaconda Navigator or Anaconda Prompt.
Open the Anaconda Prompt Terminal and it should look like

LabelIMG
(base) C:\Users\User1>pip install labelimg
After Labelimg is downloaded and installed type the following code to bootup the application up.
(base) C:\Users\User1>labelimgThis should open up the Labelimg application

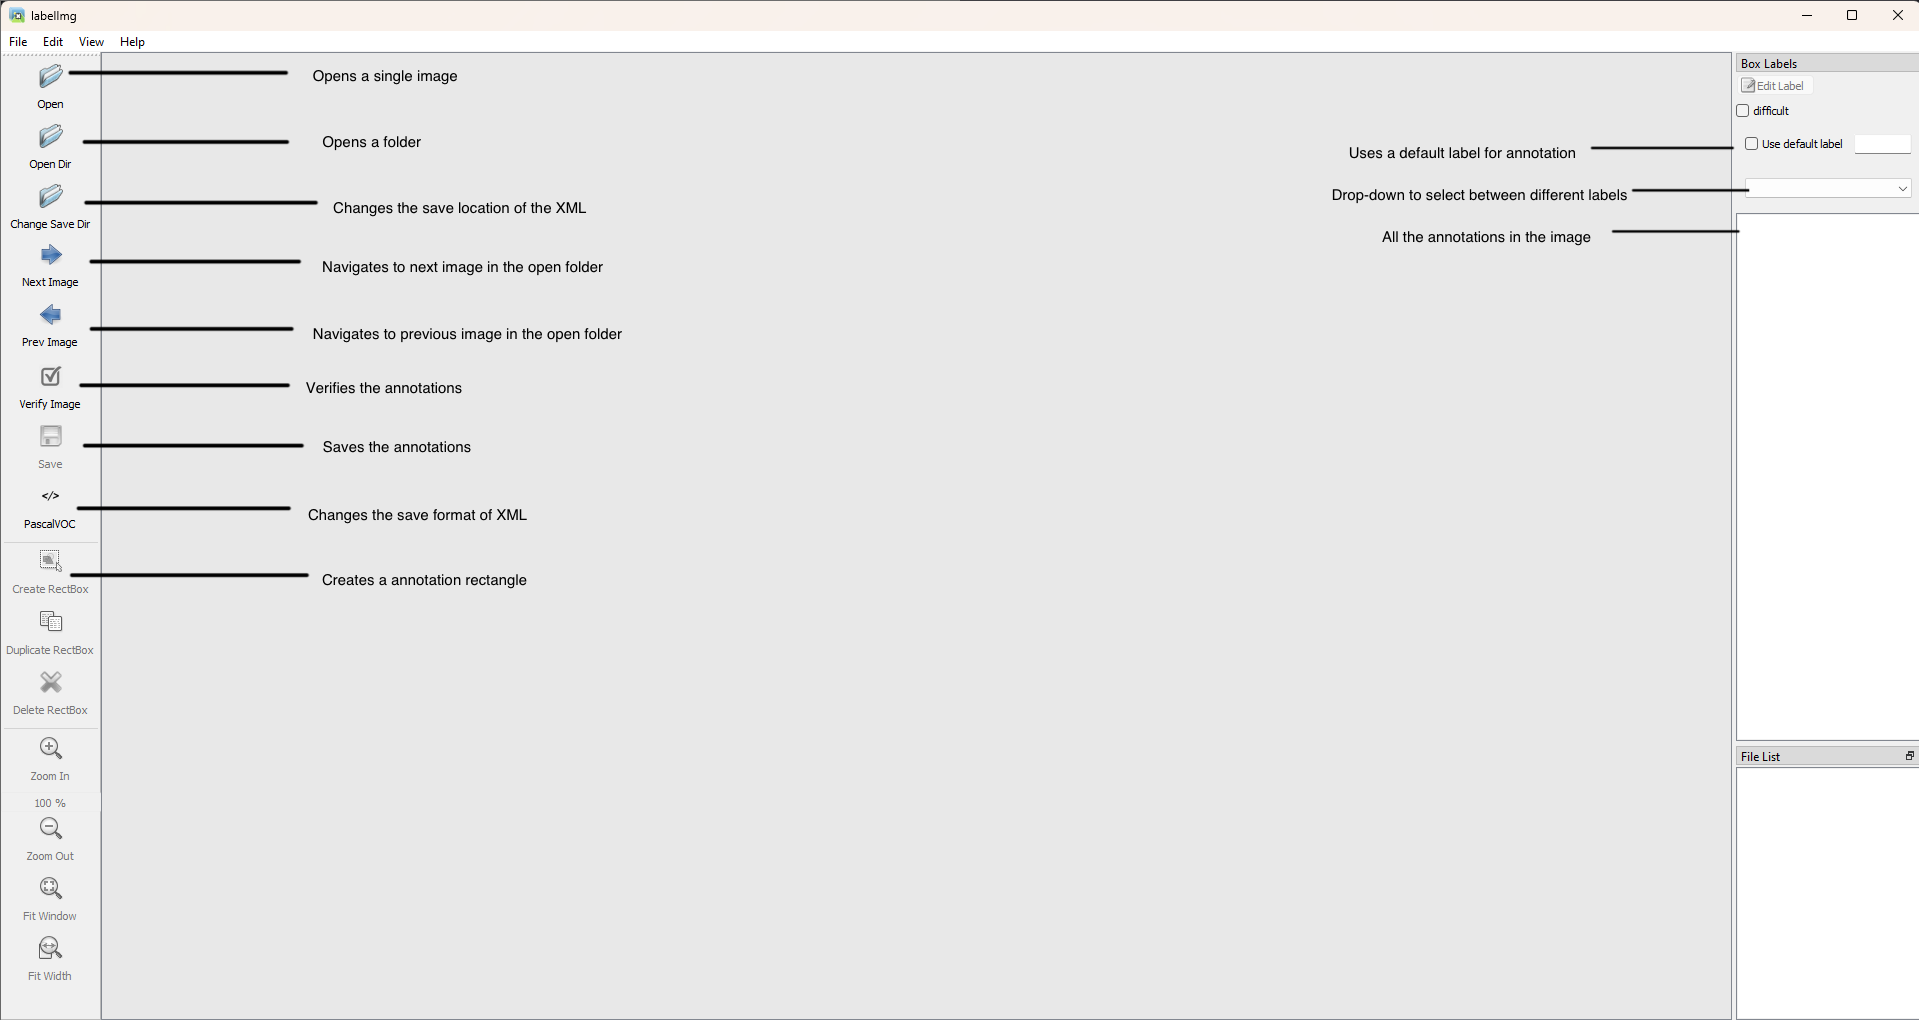
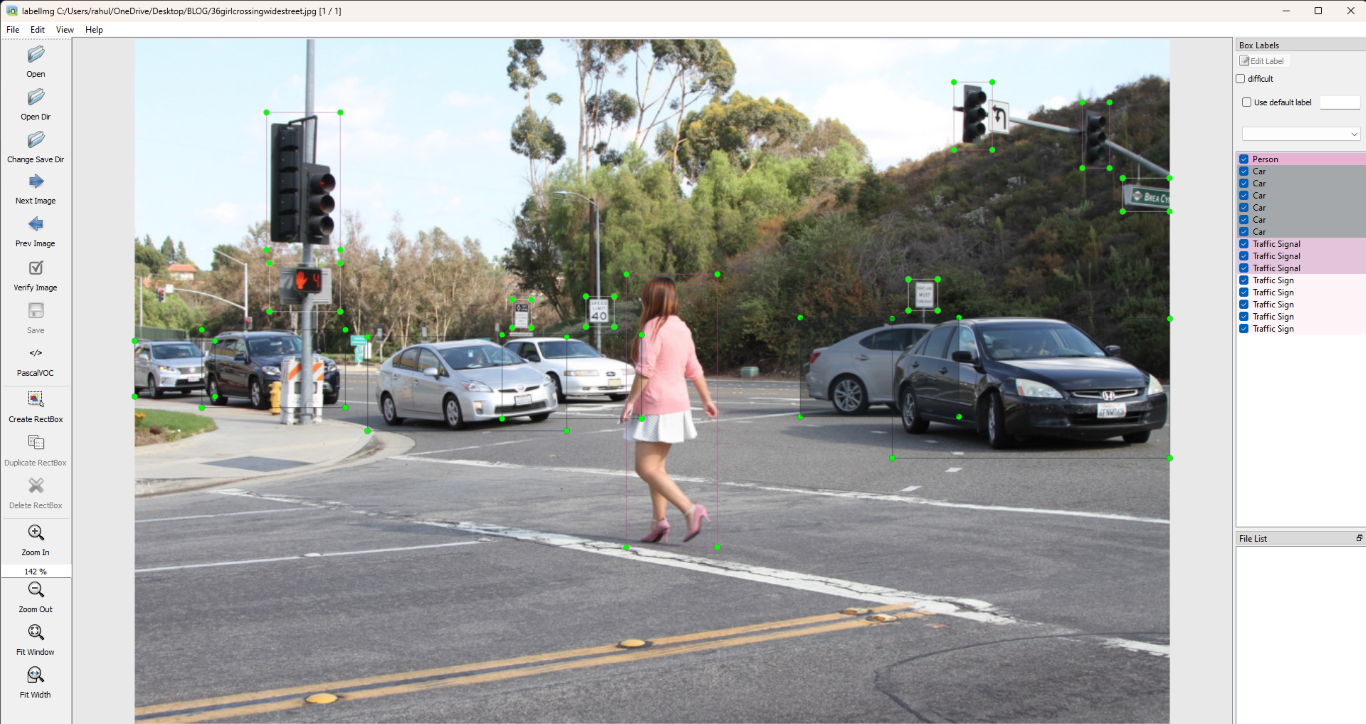
Now Open up a directory with images to start annotating by making rectangles over the different objects to be detected with their respective labels.These labels are also known as class.Make sure the format of annotation is same throught all the images.PascalVOC format is the default format and is recommended to keep the same.After making the annotations for the respective labels, it should look look like this. After annotating your images with LabelImg, organize all images and XML files into a single folder. Create a ZIP file by right-clicking the folder and selecting the compress option. Then, open Google Drive, click “+ New,” select “File upload,” and choose the ZIP file to upload.
Now, type the following command to link your google drive to the Google Colab project and access files on the drive in the project.
from google.colab import drive
drive.mount('/content/gdrive')

!cp /content/gdrive/Your_Location/images.zip /content  #change this to the location of images.zip on your drive
To prepare your dataset for machine learning, you need to create three folders: train, validation, and test. Begin by allocating 85% of your images to the train folder, ensuring your model has a substantial amount of data to learn from. Next, place 10% of the images in the validation folder to fine-tune the model’s hyperparameters and prevent overfitting. Finally, allocate the remaining 5% of the images to the test folder, which will be used to evaluate the model’s performance on unseen data. This division helps in creating a robust and reliable machine learning model.
I have provided the python script to do the same. Feel free to change the values of allocation to suite your dataset.
from pathlib import Path
import random
import os
import sys

all_images_path = '/content/images/all'
train_images_path = '/content/images/train'
validation_images_path = '/content/images/validation'
test_images_path = '/content/images/test'

jpeg_files = [path for path in Path(all_images_path).rglob('*.jpeg')]
jpg_files = [path for path in Path(all_images_path).rglob('*.jpg')]
png_files = [path for path in Path(all_images_path).rglob('*.png')]
bmp_files = [path for path in Path(all_images_path).rglob('*.bmp')]

if sys.platform == 'linux':
    JPEG_files = [path for path in Path(all_images_path).rglob('*.JPEG')]
    JPG_files = [path for path in Path(all_images_path).rglob('*.JPG')]
    all_files = jpg_files + JPG_files + png_files + bmp_files + JPEG_files + jpeg_files
else:
    all_files = jpg_files + png_files + bmp_files + jpeg_files

total_files = len(all_files)
print('Total images: %d' % total_files)

train_split = 0.85 # 85% of the files go to train
validation_split = 0.1 # 10% go to validation
test_split = 0.05 # 5% go to test
train_count = int(total_files * train_split)
validation_count = int(total_files * validation_split)
test_count = total_files - train_count - validation_count
print('Images moving to train: %d' % train_count)
print('Images moving to validation: %d' % validation_count)
print('Images moving to test: %d' % test_count)

for _ in range(train_count):
    selected_file = random.choice(all_files)
    file_name = selected_file.name
    file_stem = selected_file.stem
    parent_directory = selected_file.parent
    xml_file_name = file_stem + '.xml'
    os.rename(selected_file, train_images_path + '/' + file_name)
    os.rename(os.path.join(parent_directory, xml_file_name), os.path.join(train_images_path, xml_file_name))
    all_files.remove(selected_file)

for _ in range(validation_count):
    selected_file = random.choice(all_files)
    file_name = selected_file.name
    file_stem = selected_file.stem
    parent_directory = selected_file.parent
    xml_file_name = file_stem + '.xml'
    os.rename(selected_file, validation_images_path + '/' + file_name)
    os.rename(os.path.join(parent_directory, xml_file_name), os.path.join(validation_images_path, xml_file_name))
    all_files.remove(selected_file)

for _ in range(test_count):
    selected_file = random.choice(all_files)
    file_name = selected_file.name
    file_stem = selected_file.stem
    parent_directory = selected_file.parent
    xml_file_name = file_stem + '.xml'
    os.rename(selected_file, test_images_path + '/' + file_name)
    os.rename(os.path.join(parent_directory, xml_file_name), os.path.join(test_images_path, xml_file_name))
    all_files.remove(selected_file)
LabelMap and TFrecord
TFRecord is a format used with TensorFlow to store data efficiently. It’s great for large datasets, such as images or sequences, because it saves the data as binary records, making loading and processing faster. This helps improve the performance and scalability of TensorFlow models. LabelMaps are files that match label numbers to readable names. They’re crucial in TensorFlow, especially for tasks like object detection where the model outputs numeric class IDs. The LabelMap helps translate these numbers back into understandable labels, making it easier to interpret and evaluate what the model is doing. Together, TFRecords and LabelMaps make managing and understanding data smoother, aiding in building strong machine learning models with TensorFlow.
Now to declare the classes used during the annotation into this code.
%%bash
cat <<EOF >> /content/labelmap.txt
Class 1
Class 2
EOF
Now download and run the following scripts of my github repository
# Download data conversion scripts
! wget https://raw.githubusercontent.com/Rahul-2004/ObjectDetectionTFlite/main/create_csv.py
! wget https://raw.githubusercontent.com/Rahul-2004/ObjectDetectionTFlite/main/create_tfrecord.py
!python3 create_csv.py
Reviewing Data Integrity
Before proceeding with training the model, it is crucial to verify that each image has a corresponding XML file. This step is important because, in Google Colab, the created TFRecord will be stored in memory for a certain period. If we create a TFRecord and later discover that some images are missing their XML files, we won’t be able to rerun the model until Colab deletes the existing TFRecord from memory. This can cause delays and make troubleshooting more difficult. Ensuring all necessary files are present now will streamline the process and help avoid complications during model training.The following code ensures the same.
import os
import pandas as pd

# Define paths
train_csv_path = '/content/images/train_labels.csv'
validation_csv_path = '/content/images/validation_labels.csv'
train_folder = '/content/images/train'
validation_folder = '/content/images/validation'

# Load CSV files
train_df = pd.read_csv(train_csv_path)
validation_df = pd.read_csv(validation_csv_path)

# Check for missing PNG files in train folder
missing_png_train = [] for index, row in train_df.iterrows():
    filename = row['filename']
    png_path = os.path.join(train_folder, filename.replace('.xml', '.png'))
    if not os.path.exists(png_path):
        missing_png_train.append(filename)

# Check for missing PNG files in validation folder
missing_png_validation = [] for index, row in validation_df.iterrows():
    filename = row['filename']
    png_path = os.path.join(validation_folder, filename.replace('.xml', '.png'))
    if not os.path.exists(png_path):
        missing_png_validation.append(filename)

# Check for missing XML files in train folder
missing_xml_train = []
for filename in os.listdir(train_folder):
    if filename.endswith('.xml') and not os.path.exists(os.path.join(train_folder, filename.replace('.xml', '.png'))):
        missing_xml_train.append(filename)

# Check for missing XML files in validation folder
missing_xml_validation = []
for filename in os.listdir(validation_folder):
    if filename.endswith('.xml') and not os.path.exists(os.path.join(validation_folder, filename.replace('.xml', '.png'))):
        missing_xml_validation.append(filename)

# Delete missing names from train CSV
train_df = train_df[~train_df['filename'].isin(missing_png_train + missing_xml_train)]
train_df.to_csv(train_csv_path, index=False)

# Delete missing names from validation CSV
validation_df = validation_df[~validation_df['filename'].isin(missing_png_validation + missing_xml_validation)]
validation_df.to_csv(validation_csv_path, index=False)

# Print results
if missing_png_train:
    print(f'Missing PNG files in train folder: {missing_png_train}')
if missing_png_validation:
    print(f'Missing PNG files in validation folder: {missing_png_validation}')
if missing_xml_train:
    print(f'Missing XML files in train folder: {missing_xml_train}')
if missing_xml_validation:
    print(f'Missing XML files in validation folder: {missing_xml_validation}')
Once we are sure about all the files we can head toward creating an error free tfrecord.
!python3 create_tfrecord.py --csv_input=images/train_labels.csv --labelmap=labelmap.txt --image_dir=images/train --output_path=train.tfrecord

!python3 create_tfrecord.py --csv_input=images/validation_labels.csv --labelmap=labelmap.txt --image_dir=images/validation --output_path=val.tfrecord train_record_fname = '/content/train.tfrecord' val_record_fname = '/content/val.tfrecord' label_map_pbtxt_fname = '/content/labelmap.pbtxt'
Configure Training
We are now at the stage of configuring the model training process. To begin, you can visit the TensorFlow Model Zoo, which offers a comprehensive repository of pre-trained models designed for various tasks, including object detection. Explore the available models at ModelZoo. Additionally, for insights into TensorFlow Lite object detection models and their performance comparison, you can refer to the detailed analysis provided by Evan Juras, click here to visit the documentation. This resource compares the effectiveness of various models based on different metrics, helping you choose the most suitable one for your project requirements. Once you have selected the optimal model, proceed by specifying its name in the chosen_model variable to proceed with configuring and training your model accordingly.
chosen_model = "ssd-mobilenet-v2-fpnlite-320"
MODELS_CONFIG = {
    "ssd-mobilenet-v2": {
        "model_name": "ssd_mobilenet_v2_320x320_coco17_tpu-8",
        "base_pipeline_file": "ssd_mobilenet_v2_320x320_coco17_tpu-8.config",
        "pretrained_checkpoint": "ssd_mobilenet_v2_320x320_coco17_tpu-8.tar.gz",
    },
    "efficientdet-d0": {
        "model_name": "efficientdet_d0_coco17_tpu-32",
        "base_pipeline_file": "ssd_efficientdet_d0_512x512_coco17_tpu-8.config",
        "pretrained_checkpoint": "efficientdet_d0_coco17_tpu-32.tar.gz",
    },
    "ssd-mobilenet-v2-fpnlite-320": {
        "model_name": "ssd_mobilenet_v2_fpnlite_320x320_coco17_tpu-8",
        "base_pipeline_file": "ssd_mobilenet_v2_fpnlite_320x320_coco17_tpu-8.config",
        "pretrained_checkpoint": "ssd_mobilenet_v2_fpnlite_320x320_coco17_tpu-8.tar.gz",
    },
}
model_name = MODELS_CONFIG[chosen_model]["model_name"]
pretrained_checkpoint = MODELS_CONFIG[chosen_model]["pretrained_checkpoint"]
base_pipeline_file = MODELS_CONFIG[chosen_model]["base_pipeline_file"]
Using Pre-trained Models
First, make a new folder named “mymodel” under “/content/models/”. This folder will keep all the important pre-trained weights. These weights have learned information from training on a big dataset, especially for tasks like object detection. Once the folder is ready, go into it using %cd /content/models/mymodel/.
Next, get the pre-trained model weights from TensorFlow’s website. These weights come in a compressed tarfile format. Extract this file into the current folder to get the pre-trained weights needed to start your custom model.
Also, get the training setup file for the model from TensorFlow’s GitHub page. This file has important settings and details needed to set up and train your custom object detection model.
%mkdir /content/models/mymodel/
%cd /content/models/mymodel/

import tarfile
download_tar = 'http://download.tensorflow.org/models/object_detection/tf2/20200711/' + pretrained_checkpoint
!wget {download_tar}
tar = tarfile.open(pretrained_checkpoint)
tar.extractall()
tar.close()
download_config = 'https://raw.githubusercontent.com/tensorflow/models/master/research/object_detection/configs/tf2/' + base_pipeline_file
!wget {download_config}
Setting Custom Parameters
When setting up training for your object detection model, you can adjust several important settings to fit your project needs. The num_steps parameter, set to 10,000 by default, controls how many training steps the model will take. You can change this number to make the training longer or shorter, depending on your goals.Usually more the steps more the model learns to make accurate predictions.
The batch_size parameter changes based on the model you choose. For the ‘efficientdet-d0’ model, the batch size is 8, meaning 8 images are processed at once during each training step. This setting affects how fast the training runs and how much memory it uses. If your GPU or training setup needs a different batch size, you can change this number. For other models not specifically mentioned, the default batch size is 24.
By adjusting these settings—num_steps, chosen_model, and batch_size—you can make the training process more efficient and better suited to your project’s needs. This helps your model learn to detect objects more accurately for your application.
num_steps = 10000
if chosen_model == 'efficientdet-d0':
    batch_size = 8
else:
    batch_size = 24
pipeline_fname = "/content/models/mymodel/" + base_pipeline_file
fine_tune_checkpoint = "/content/models/mymodel/" + model_name + "/checkpoint/ckpt-0"


def get_num_classes(pbtxt_fname):
    from object_detection.utils import label_map_util

    label_map = label_map_util.load_labelmap(pbtxt_fname)
    categories = label_map_util.convert_label_map_to_categories(
        label_map, max_num_classes=90, use_display_name=True
    )
    category_index = label_map_util.create_category_index(categories)
    return len(category_index.keys())

num_classes = get_num_classes(label_map_pbtxt_fname)
print("Total classes:", num_classes)
Then we need to tweak a few parameters in the pipline_file.config file to run the model smoothly.
import re
%cd /content/models/mymodel
print('writing custom configuration file')
with open(pipeline_fname) as f:
    s = f.read()
with open('pipeline_file.config', 'w') as f:  # Set fine_tune_checkpoint path
    s = re.sub('fine_tune_checkpoint: ".*?"', 'fine_tune_checkpoint: "{}"'.format(fine_tune_checkpoint), s) # Set tfrecord files for train and test datasets
    s = re.sub( '(input_path: ".*?)(PATH_TO_BE_CONFIGURED/train)(.*?")', 'input_path: "{}"'.format(train_record_fname), s)
    s = re.sub( '(input_path: ".*?)(PATH_TO_BE_CONFIGURED/val)(.*?")', 'input_path: "{}"'.format(val_record_fname), s) # Set label_map_path
    s = re.sub( 'label_map_path: ".*?"', 'label_map_path: "{}"'.format(label_map_pbtxt_fname), s) # Set batch_size s = re.sub('batch_size: [0-9]+', 'batch_size: {}'.format(batch_size), s) # Set training steps, num_steps
    s = re.sub('num_steps: [0-9]+', 'num_steps: {}'.format(num_steps), s) # Set number of classes num_classes
    s = re.sub('num_classes: [0-9]+', 'num_classes: {}'.format(num_classes), s) # Change fine-tune checkpoint type from "classification" to "detection"
    s = re.sub( 'fine_tune_checkpoint_type: "classification"', 'fine_tune_checkpoint_type: "{}"'.format('detection'), s)
    f.write(s)
Saving the checkpoints in their respective directories.
pipeline_file = '/content/models/mymodel/pipeline_file.config'
model_dir = '/content/training/'
Training the Model
The model is ready for training. Now, we will start TensorBoard to monitor the training process. TensorBoard is a helpful tool that shows us how the training is going by displaying graphs of important metrics like loss and accuracy. It also provides visualizations of the model’s structure and the data being used. By watching TensorBoard, we can make sure the training is on track and make adjustments if needed to improve the model’s performance.
%load_ext tensorboard
%tensorboard --logdir '/content/training/train'
To start training,
!python /content/models/research/object_detection/model_main_tf2.py \
    --pipeline_config_path={pipeline_file} \
    --model_dir={model_dir} \
    --alsologtostderr \
    --num_train_steps={num_steps} \
    --sample_1_of_n_eval_examples=1
Once the training is done successfully, we will conver the model with the learned weights from the training data, Let us export it to be able to use it on any device.
Exporting the model as TFlite
First, we need to export the model graph (a file that contains information about the architecture and weights) to a TensorFlow Lite-compatible format. We’ll do this using the export_tflite_graph_tf2.py script.
!mkdir /content/custom_model_lite
output_directory = '/content/custom_model_lite' # Path to training directory (the conversion script automatically chooses the highest checkpoint file)
last_model_path = '/content/training'

!python /content/models/research/object_detection/export_tflite_graph_tf2.py \
    --trained_checkpoint_dir {last_model_path} \
    --output_directory {output_directory} \
    --pipeline_config_path {pipeline_file}
import tensorflow as tf

converter = tf.lite.TFLiteConverter.from_saved_model('/content/custom_model_lite/saved_model')
tflite_model = converter.convert()

with open('/content/custom_model_lite/detect.tflite', 'wb') as f:
    f.write(tflite_model)
Testing the Model
Once the model is trained and downloaded successfully, make a python file with the following code to run the model.
import os
import argparse
import cv2
import numpy as np
import sys
import glob
import importlib.util

# Argument parser for command line arguments
parser = argparse.ArgumentParser()
parser.add_argument('--modeldir', help='Folder the .tflite file is located in', required=True)
parser.add_argument('--graph', help='Name of the .tflite file, if different than detect.tflite', default='detect.tflite')
parser.add_argument('--labels', help='Name of the labelmap file, if different than labelmap.txt', default='labelmap.txt')
parser.add_argument('--threshold', help='Minimum confidence threshold for displaying detected objects', default=0.5)
parser.add_argument('--image', help='Name of the single image to perform detection on. To run detection on multiple images, use --imagedir', default=None)
parser.add_argument('--imagedir', help='Name of the folder containing images to perform detection on. Folder must contain only images.', default=None)
parser.add_argument('--save_results', help='Save labeled images and annotation data to a results folder', action='store_true')
parser.add_argument('--noshow_results', help='Don\'t show result images (only use this if --save_results is enabled)', action='store_false')

args = parser.parse_args()

# Define the paths and filenames
MODEL_NAME = args.modeldir
GRAPH_NAME = args.graph
LABELMAP_NAME = args.labels
min_conf_threshold = float(args.threshold)
save_results = args.save_results
show_results = args.noshow_results
IM_NAME = args.image
IM_DIR = args.imagedir

# Validate image and imagedir arguments
if (IM_NAME and IM_DIR):
    print('Error! Please only use the --image argument or the --imagedir argument, not both. Issue "python TFLite_detection_image.py -h" for help.')
    sys.exit()
if (not IM_NAME and not IM_DIR):
    IM_NAME = 'test1.jpg'

# Import the TensorFlow Lite interpreter
pkg = importlib.util.find_spec('tflite_runtime')
if pkg:
    from tflite_runtime.interpreter import Interpreter
else:
    from tensorflow.lite.python.interpreter import Interpreter

# Get the current working directory
CWD_PATH = os.getcwd()

# Define the image paths
if IM_DIR:
    PATH_TO_IMAGES = os.path.join(CWD_PATH, IM_DIR)
    images = glob.glob(PATH_TO_IMAGES + '/*.jpg') + glob.glob(PATH_TO_IMAGES + '/*.png') + glob.glob(PATH_TO_IMAGES + '/*.bmp')
    if save_results:
        RESULTS_DIR = IM_DIR + '_results'
elif IM_NAME:
    PATH_TO_IMAGES = os.path.join(CWD_PATH, IM_NAME)
    images = glob.glob(PATH_TO_IMAGES)
    if save_results:
        RESULTS_DIR = 'results'

if save_results:
    RESULTS_PATH = os.path.join(CWD_PATH, RESULTS_DIR)
    if not os.path.exists(RESULTS_PATH):
        os.makedirs(RESULTS_PATH)

# Load the TensorFlow Lite model and labels
PATH_TO_CKPT = os.path.join(CWD_PATH, MODEL_NAME, GRAPH_NAME)
PATH_TO_LABELS = os.path.join(CWD_PATH, MODEL_NAME, LABELMAP_NAME)

with open(PATH_TO_LABELS, 'r') as f:
    labels = [line.strip() for line in f.readlines()]

if labels[0] == '???':
    del(labels[0])

interpreter = Interpreter(model_path=PATH_TO_CKPT)
interpreter.allocate_tensors()

# Get model details
input_details = interpreter.get_input_details()
output_details = interpreter.get_output_details()
height = input_details[0]['shape'][1]
width = input_details[0]['shape'][2]
floating_model = (input_details[0]['dtype'] == np.float32)

input_mean = 127.5
input_std = 127.5

outname = output_details[0]['name']

if ('StatefulPartitionedCall' in outname):
    boxes_idx, classes_idx, scores_idx = 1, 3, 0
else:
    boxes_idx, classes_idx, scores_idx = 0, 1, 2

# Process each image
for image_path in images:
    image = cv2.imread(image_path)
    image_rgb = cv2.cvtColor(image, cv2.COLOR_BGR2RGB)
    imH, imW, _ = image.shape
    image_resized = cv2.resize(image_rgb, (width, height))
    input_data = np.expand_dims(image_resized, axis=0)

    if floating_model:
        input_data = (np.float32(input_data) - input_mean) / input_std

    interpreter.set_tensor(input_details[0]['index'], input_data)
    interpreter.invoke()

    boxes = interpreter.get_tensor(output_details[boxes_idx]['index'])[0]
    classes = interpreter.get_tensor(output_details[classes_idx]['index'])[0]
    scores = interpreter.get_tensor(output_details[scores_idx]['index'])[0]

    detections = []

    for i in range(len(scores)):
        if ((scores[i] > min_conf_threshold) and (scores[i] <= 1.0)):
            ymin = int(max(1, (boxes[i][0] * imH)))
            xmin = int(max(1, (boxes[i][1] * imW)))
            ymax = int(min(imH, (boxes[i][2] * imH)))
            xmax = int(min(imW, (boxes[i][3] * imW)))

            cv2.rectangle(image, (xmin, ymin), (xmax, ymax), (10, 255, 0), 2)

            object_name = labels[int(classes[i])]
            label = '%s: %d%%' % (object_name, int(scores[i] * 100))
            labelSize, baseLine = cv2.getTextSize(label, cv2.FONT_HERSHEY_SIMPLEX, 0.7, 1)
            label_ymin = max(ymin, labelSize[1] + 10)
            cv2.rectangle(image, (xmin, label_ymin - labelSize[1] - 10), (xmin + labelSize[0], label_ymin + baseLine - 10), (255, 255, 255), cv2.FILLED)
            cv2.putText(image, label, (xmin, label_ymin - 7), cv2.FONT_HERSHEY_SIMPLEX, 0.7, (0, 0, 0), 2)

            detections.append([object_name, scores[i], xmin, ymin, xmax, ymax])

    if show_results:
        cv2.imshow('Object detector', image)
        if cv2.waitKey(0) == ord('q'):
            break

    if save_results:
        image_fn = os.path.basename(image_path)
        image_savepath = os.path.join(CWD_PATH, RESULTS_DIR, image_fn)
        base_fn, ext = os.path.splitext(image_fn)
        txt_result_fn = base_fn + '.txt'
        txt_savepath = os.path.join(CWD_PATH, RESULTS_DIR, txt_result_fn)
        cv2.imwrite(image_savepath, image)
        with open(txt_savepath, 'w') as f:
            for detection in detections:
                f.write('%s %.4f %d %d %d %d\n' % (detection[0], detection[1], detection[2], detection[3], detection[4], detection[5]))

cv2.destroyAllWindows()
This code takes in various arguments to run the prediction.
For running the model on a directory of images,
python script_name.py --modeldir "my_model_directory" --imagedir "my_image_directory"For running the model on a single image,
python script_name.py --modeldir "my_model_directory" --image "my_image.jpg"
Replace script_name.py with the name of the script ,my_model_directory with the path of the folder with all the model files and my_image_directory and my_image.jpg with their respective paths.Remember to mention the path within quotes.


Be First to Comment