The serial port is like a digital messenger that electronic devices use to share information. If you have ever workeded with an Arduino or Raspberry Pi, you may know that we create a serial connection, and begin sending information over a specific baudRate. The outputs are generally viewed on a serial monitor. Now we being computer science students must know how to integrate this hardware with software as well. How can we use the data being sent by the Arduino or Raspberry Pi inside a script, webb application, mobile application or a desktop application. For this multiple languages and frameworks support communication via the SerialPort, however using these is troublesome for beginners at first as we will see in the article.
Programming the microcontroller
Let us begin by first writing a simple script which sends data over the serial port form the microcontroller. For this you will need a microcontroller, in my case I am using an Arduino UNO, the cable that connects the microcontroller to the laptop and the Arduino IDE, you can also use the Arduino Web Editor if you do not wish to install the IDE.
We will be writing a simple code which does the following:
- Creates a serial connection
- Continuously sends data over the connection
// main.ino

void setup() {
  Serial.begin(115200);  // baudRate
}

void loop() {

  int randomNumber = random(100); // generates random number
  Serial.println(randomNumber); // prints to serial monitor
  delay(100); // pause for 100 miliseconds
}
Now upload it to the microcontroller using the upload button on the top left corner and see the results on the serial monitor.
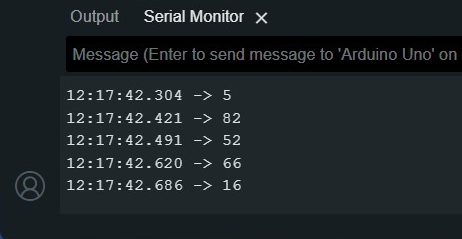
If the serial monitor is not visible then click the button on the top right corner which looks like a magnifying glass. Okay so now that we have setup the script for the microcontroller lets try to read it.
Using javascript to read from serialport
So if you try to find the code on ChatGPT you find the following code, where you will have to just replace the portName and baudRate and it should work just fine.
// main.js

const SerialPort = require('serialport');
const Readline = require('@serialport/parser-readline');

const port = new SerialPort('COM8', { baudRate: 115200 });
const parser = port.pipe(new Readline({ delimiter: '\n' }));

parser.on('data', (data) => {
  console.log('Data from serial port:', data);
});

port.on('error', (err) => {
  console.error('Error:', err.message);
});
The first thing that you realise after running this is that something is wrong because this isn’t working?!
Note you will need npm and install the serialport module using the command npm install serialport. To run the javascript file simply use node /path/to/js-file in the terminal. In my case it was node main.js.
 What do you even mean by
 SerialPort is not a constructor?? These kind of error arise due to the change in the way the constructor is called which was probably brought in, in a later version of the package. So lets see the changes you’d have to do to this code to get it to work.
// main.js

const { SerialPort } = require('serialport');
// instead of const SerialPort = require('serialport');

const port = new SerialPort({
    path: 'COM8',
    baudRate: 115200
});

// note that all params are passed
// as an object to the SerialPort
// constructor
So it should work now right? No its not going to work that easily 😂😭 The next error you’re going to get it with the ReadLine constructor. It would look somewhat like this.
 So again this is an error with the declaration of the
 ReadLine module and the way the constructor is called. So looking at the docs now the correct syntax is as follows.
// main.js

const { SerialPort } = require('serialport');
const { ReadlineParser } = require('@serialport/parser-readline')

const port = new SerialPort({ path: 'COM8',  baudRate: 115200 });
const parser = port.pipe(new ReadlineParser({ delimiter: '\r\n' }))

parser.on('data', console.log)
So now it should surely work right? I mean its just a 5 line code, what could go wrong? So lets run it.

Okay so we have not encountered that type of error before. This error has arisen because the access to the serialport was denied to our code. This is a very beginner mistake that almost everyone makes and it is a very simple error to solve. When we ran the code in the Arduino IDE we used the serial-monitor to see the output. Only one process can have access over the serialport at a time, and since the access was with the serial-monitor we got this error. So now if we go back and close the serial-monitor and then run our code using node main.js we shoult be able to see the desired outputs.
 But why stop here. Lets try to use this ‘working’ code in a desktop application.
Electron
Electron.js is a javascript framework designed to create cross platform desktop applications using web technologies like HTML/CSS/JS that are rendered using a version of the chromium browser engine and a backend using the node.js run-time environment.
Let us try to build a basic desktop application which will listen over a serialport at a specific baudrate and display the data in our application.
Setup
The setup of the application is pretty simple. Run the following commands.
npm init -ynpm install electron serialport- In
package.jsonadd"start": "electron .",to scripts - Replace
index.jswithmain.jsin the main section inpackage.json touch main.js renderer.js index.html style.css
Creating main window
Paste the following code inside the main.js file. This simple creates a window of size 500×600 and it’s a standard boilerplate template.
// main.js

const { app, BrowserWindow } = require("electron");
const path = require("path");
const isMac = process.platform === "darwin";

function createMainWindow() {
  const mainWindow = new BrowserWindow({
    title: "Propulsion Testing Software",
    width: 500,
    height: 600,
  });

  mainWindow.loadFile(path.join(__dirname, "index.html"));
  mainWindow.maximize();
  //mainWindow.setFullScreen(true);
}

app.whenReady().then(() => {
  createMainWindow();
  app.on("activate", () => {
    if (BrowserWindow.getAllWindows().length === 0) {
      createMainWindow();
    }
  });
});

app.on("window-all-closed", () => {
  if (!isMac) {
    app.quit();
  }
});
Now let us write the HTML and CSS code to structure and style the page.
<!-- index.html -->

<!DOCTYPE html>
<html lang="en">
<head>
    <meta charset="UTF-8">
    <meta name="viewport" content="width=device-width, initial-scale=1.0">
    <title>Serial Reader</title>
    <link rel="stylesheet" href="style.css">
</head>
<body>
    <div class="content">
        <h1>Serial Reader</h1>
    <h3>This data is being streamed from the serial port: </h3>
    <div class="serial-content">
        <p id="serial-content"></p>
    </div>
    <script src="renderer.js"></script>
    </div>

</body>
</html>
/* style.css */

body{
    background-color: rgb(62, 62, 62);
    display: flex;
    flex-direction: column;
    align-items: center;
    justify-content: center;
}
.content{
    background-color: black;
    margin-top: 20%;
    height: 50vh;
    width: 70%;
    border-radius: 10px;
    color: white;
    padding: 20px;
}
.serial-content{
    background-color: rgb(95, 95, 95);
    width: 40%;
    height: 40px;
    border-radius: 10px;
    color: black;
}
#serial-content{
    padding-left: 20px;
    padding-top: 10px;
    font-size: 20px;
    font-weight: 600;
    color: white;
}
With this we have completed the basic setup of a basic electron.js application.
Renderer.js
Now we should be able to simply copy paste the code written here inside the renderer.js file and ideally it should work. Let us try that.
Paste the code below inside renderer.js
// renderer.js

const { SerialPort } = require("serialport");

const port = new SerialPort({ path: "COM8", baudRate: 115200 });
const serialDisplay = document.getElementById("serial-content");

window.addEventListener("DOMContentLoaded", function () {
  port.on("readable", function () {
    const data = port.read().toString();
    console.log("Data:", data);
    serialDisplay.textContent = data;
  });
});
Now let us run the application using npm start.
What do we observe? There are no errors visible in the terminal however the code isnt working. If we open the dev-tools using Ctrl + Shift + Iwe can see that we have the following error.
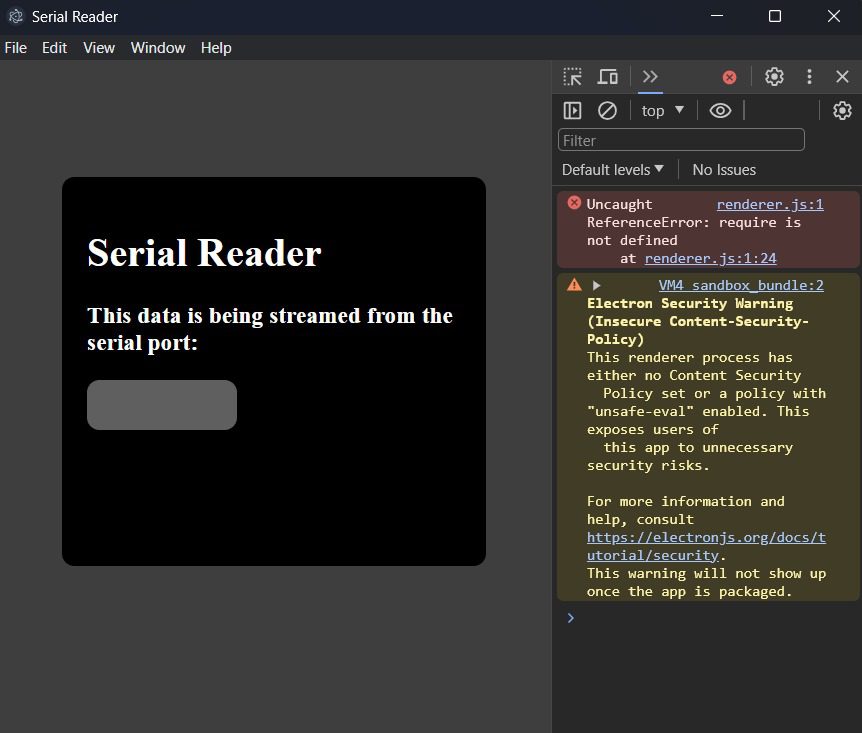 Okay so let us try to understand why we might’ve gotten this error. In
 electron.js there are 2 types of processes. The main process and a renderer process. The main process is the one that creates windows, under which multiple renderer processes can run. By default these renderer processes do not have access to using node modules out of the box. For this you will have to enable nodeIntegration in the main.js file like so. And this is what even ChatGPT would tell you to do.
// main.js

// ...rest of the code
const mainWindow = new BrowserWindow({
    title: "Propulsion Testing Software",
    width: 500,
    height: 600,
    webPreferences: {
      nodeIntegration: true,
    }
});
// ...rest of the code
Let us see if this works or not. Run the application again using npm start.
It doesn’t work?! If we enabled nodeIntegration we should be able to require('serialport') in renderer.js but that is not the case. Now ChatGPT would tell you to use something called the ipcRenderer and the ipcMainto solve this issue. IPC stands for inter process communication. Since we are unable to use node modules inside the renderer process it will suggest you to either read the data in your main process or setup a preload script for your renderer process. The main idea behind this approach being to read the data in one place and send the data over ipc to the desired file.
You can try this approach however even this won’t work immediately. Also at times you would not want to use ipc as that would involve streaming the data twice! As mentioned here we must set enableRemoteModule to true and contextIsolation to false. ContextIsolation allows us to build a contextBridge to enable certain functions and services to the renderer process from the preload script which it would not have access to by default. Since we won’t be using this we will set it to false.
// main.js

// ...rest of the code
webPreferences: {
      nodeIntegration: true,
      contextIsolation: false,
      enableRemoteModule: true,
}
// ...rest of the code
Now when we run the application it should work perfectly!👌
If you face any other errors apart from the above mentioned, do let me know in the comments below👇


This is of great help!
Ty Aryan, this will be great for my class !