OpenCV is a pretty handy tool while working with image processing and computer vision. It’s a large open-source library which can be accessed in a variety of programming languages, including Python. It has also been used for video analysis and real-world applications like CCTV footage analysis.
OpenCV can be easily installed via the command console, to be used in various capacities while programming in Python.
To use the various packages included in OpenCV, we can install it using pip, via the command,
pip install opencv-python
PIL (Python Imaging Library) is another useful open-source library which supports opening and using various image formats. By installing PIL as well, we can further improve our ability to integrate OpenCV packages in out programs.
We can install PIL using the command:
pip install Pillow
A simple GUI utilizing tkinter is in general, more user-friendly and simpler to use. Hence, we can integrate OpenCV based programs with a tkinter GUI for easier access of end product.
Tkinter can be installed with the command,
pip install tk
To demonstrate, we can create a Python program which utilizes an OpenCV package to open the user’s webcam. The user can then get the RGB codes of various regions in the captured feed via a tkinter GUI.
To begin, we have to import the various packages to be used, from OpenCV, Tkinter and PIL
import cv2
from tkinter import *
from PIL import Image, ImageTk
VideoCapture() is the function in package cv2 which can open a camera for video capturing, whereas the cvtColor() function converts the colourspace of the image provided. Here the first frame from the video feed is provided to be converted to RGB.
vc = cv2.VideoCapture(0)
cv2image= cv2.cvtColor(vc.read()[1],cv2.COLOR_BGR2RGB)
In the GUI, buttons and labels are created to facilitate turning on the camera with user’s permission, and displaying the pixel data when any region in the video feed is clicked.
window = Tk()
window.title("Video feed")
window.geometry("1200x700")
button = Button(window,text="Click to open camera")
button.grid(row=0, column=0)
label = Label(window, height=500, width=650, text="Video feed here")
label.grid(row=1, column=1, columnspan=1)
label_pix1 = Label(window, height=5, width=30, text="Pixel Location: ")
label_pix1.grid(row=2, column=0)
label_pix2 = Label(window, height=5, width=30, text="Pixel colour scheme (RGB): ")
label_pix2.grid(row=2, column=1)
label_pix3 = Label(window, height=5, width=30, text="Pixel colour scheme (HexCode): ")
label_pix3.grid(row=2, column=3)
Two functions are created to implement these roles.
Show_frames() displays the video feed from the webcam.
At a set interval, a frame from the webcam feed is set as a PhotoImage object (from the PIL package) and updated in the GUI.
def show_frames():
      global cv2image
      cv2image = cv2.cvtColor(vc.read()[1],cv2.COLOR_BGR2RGB)
      img = Image.fromarray(cv2image)

      imgtk = ImageTk.PhotoImage(image = img)
      label.imgtk = imgtk
      label.configure(image=imgtk)
      label.after(20, show_frames)
Pixel_colour() updates the information regarding the clicked pixel, every time a new pixel is clicked in the video feed. Also, the pixel data is printed onto the console.
def pixelcolour(pix):
    print("Pixel location")
    print (pix.x, pix.y)
    label_pix1.config(text=f"Pixel Location: ({pix.x}, {pix.y})")
    print("RGB colour")
    print (cv2image[pix.x, pix.y])
    label_pix2.config(text=f"Pixel colour scheme (RGB): {cv2image[pix.x, pix.y]}")
    print("Hex colour")
    bgr_list = cv2image[pix.x, pix.y].tolist()
    hex_str="#"
    for i in reversed(bgr_list):
         hex_str+=f"{hex(i)[2:]}"
    print(hex_str)
    label_pix3.config(text=f"Pixel colour scheme (RGB): {hex_str}")
Setting the function to the button and the label in the GUI, and setting the mainloop for the window,
button.config(command=show_frames)
label.bind("<Button-1>", pixelcolour)
window.mainloop()
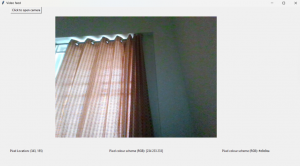
Running the program, a window is opened with a clickable button, which opens up the user’s webcam.
Click anywhere in the video feed et voila! Data about the selected pixel is displayed, which includes its position and colour scheme in RGB.


Be First to Comment