The concept of APIs is pretty fascinating when starting to code, because it allows us to integrate stuff into our projects which we would not want to develop ourselves. An API in short is just an interface for software applications to communicate. Its like the WhatsApp for applications. Let us assume you have an e-commerce application and you want to enable payments you can simply use the RazorPay API or PayTM API. Now lets dive deeper into how these APIs work, how to integrate them into out applications and by the end of this article you would have the working knowledge on how to create your own RESTful API.
What is a RESTful API?
A REST API is a way for computer programs to talk to each other over the internet. It follows certain rules to perform actions like getting data, adding new information, updating, or deleting. This is done typically using HTTP requests. There are multiple HTTP requests but we shall discuss GET, POST, PUT & DELETE as these are the ones which are most commonly used.
Now recently I was brushing up my matplotlib and wanted to plot 4 graphs in real-time and all 4 of them would be running on separate threads. For this i wanted data which would keep changing every second. For this I used the ‘Where the ISS at?’ API. This API provides you with the following information about the ISS(International Space Station) every second.
{
    "name": "iss",
    "id": 25544,
    "latitude": 50.11496269845,
    "longitude": 118.07900427317,
    "altitude": 408.05526028199,
    "velocity": 27635.971970874,
    "visibility": "daylight",
    "footprint": 4446.1877699772,
    "timestamp": 1364069476,
    "daynum": 2456375.3411574,
    "solar_lat": 1.3327003598631,
    "solar_lon": 238.78610691196,
    "units": "kilometers"
}
This API allows you to only GET the data, however this seems like a pretty basic example which showcases how these kinds of APIs work.
Where are RESTful APIs used?
In simple words a RESTful API allows CRUD based operations on a database. CRUD stands for CREATE, RETRIEVE, UPDATE, DELETE. Assume you have a Todo Application, in it you would be required to perform CRUD operations on the Todos. For this we can setup a RESTful API using which our web application or mobile application can send HTTP requests to perform the operations.
How do you send HTTP Requests?
To send HTTP requests, you typically use a programming language or a tool that supports HTTP communication. Here’s a brief overview:
If you are using python you are required to import the requests library.
import requests

response = requests.get("__endpoint_of_the_api_you_are_trying_to_hit__")  # the url is also called the endpoint of the API
print(response.body)
If you are using javascript you can directly use the fetch function.
fetch("__endpoint_of_the_api_youre_trying_to_hit__")
  .then(response => response.json())
  .then(data => console.log(data))
  .catch(error => console.error('Error:', error));
If you don’t know what json is, think of it as something which serves as a common data format for exchanging structured information between web servers and clients. Apart from json XML is also used for similar purposes.
How to create a RESTful API in python?
We will be using the Django framework to create a REST API in python. Let us go over the step by step approach on how to do this.
Install Django and initializing the project
Install django using the pip install django command in the terminal. It is generally advised to create a virtual environment first and then install all the dependancies.
After installing django we must create a project using the django-admin startproject myProject . You can change the name of the project to whatever you like.
Now we must run the command pip install djangorestframework , it allows us to seamlessly create a REST API.
Navigate to the settings.py file in your project directory, in our case it is myProject. Inside it add rest_framework to the list of installed apps like so.
# myProject/settings.py

INSTALLED_APPS = [
    # other installed apps
    # add the line below to your code
    'rest_framework',
]
Now create an app using the command python manage.py startapp api.
Creating a Model for the Data
We will now create a model of the data we are trying to store. Let us make a model for a Todo App.
# api/models.py

from django.db import models

class Todo(models.Model):
    title = models.CharField(max_length=50)
    desc = models.CharField(max_length=200)
    isDone = models.BooleanField(default=False)
    date = models.DateTimeField(auto_now_add=True)

    def __str__(self):
        return self.title
We will also have to migrate this model to the database which by default is sqlite in django. You can change it to use a different one if you like. Run python manage.py makemigrations and then python manage.py migrate to do so. If you later make changes to the models by updating existing models or by adding new models just run python manage.py migrate after making changes.
Creating a serializer
In Django, a serializer is essential for converting complex data types, such as querysets or model instances, into Python data types that can be easily rendered into JSON for API responses. Create a serializers.py file in the api folder and change its content to match the following.
# api/serializers.py

from rest_framework import serializers
from .models import Todo

class TodoSerializer(serializers.ModelSerializer):
    class Meta:
        model = Todo
        fields = '__all__'
Creating Views for Get, Create, Update, and Delete
We will create two views: TodoGetCreate for listing and creating Todo items, and TodoUpdateDelete for retrieving, updating, and deleting individual Todo items. This specifies the model (Todo) and serializer (TodoSerializer) to use for these views, streamlining the implementation of CRUD (Create, Read, Update, Delete) operations for the Todo API.
# api/views.py

from django.shortcuts import render
from rest_framework import generics
from .models import Todo
from .serializers import TodoSerializer

class TodoGetCreate(generics.ListCreateAPIView):
    queryset = Todo.objects.all()
    serializer_class = TodoSerializer

class TodoUpdateDelete(generics.RetrieveUpdateDestroyAPIView):
    queryset = Todo.objects.all()
    serializer_class = TodoSerializer
Creating urls for the Views
We will create two paths: TodoGetCreate for listing and creating Todo items, and TodoUpdateDelete for handling individual Todo items’ retrieval, updating, and deletion based on their primary key.
# api/urls.py

from django.urls import path
from .views import TodoGetCreate, TodoUpdateDelete

urlpatterns = [
    path('', TodoGetCreate.as_view()),
    path('<int:pk>', TodoUpdateDelete.as_view()),
]
Note doing just this won’t work as the paths for the project are being used from the urls.pywhich lies in the myProject directory. We will have to include the api.urls in the main urls.py.
# myProject/urls.py

from django.contrib import admin
from django.urls import include, path

urlpatterns = [
    path('admin/', admin.site.urls),
    path('', include('api.urls')),
]
Running the application
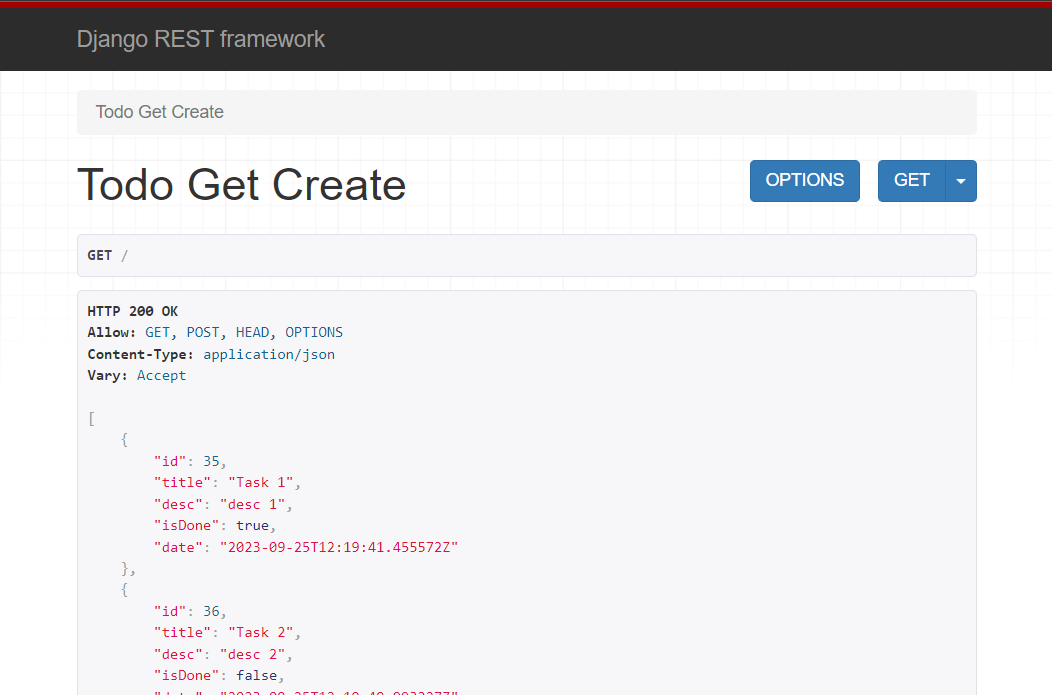
Run python manage.py runserver to test it out. You should be able to see it working at http://127.0.0.1:8000/ .



how do you create a virtual environment?
For Windows run the following commands to create and activate virtual environment:
1.
py -3 -m venv .venv2.
Set-ExecutionPolicy RemoteSigned -Scope Process3.
.venv\scripts\activateand
.venv\scripts\deactivateto deactivate the virtual environment.Yup it works! thanks.
Nice work aryan!
Thanks Saumya