What is Kubernetes?
Kubernetes also abbreviated as k8s is an orchestration tool allowing you to run and manage your container-based workloads. If you do not know what are containers, please check out this article first before carrying on with this article.
What I mean by orchestration is the automated management, coordination and deployment of various containers, microservices and other resources. This ensures scalability, agility and flexibility of the application.
Kuberenetes is mainly used for deploying cloud native applications and microservices.
How does Kubernetes achieve this?
Kubernetes can divide its architecture into two parts, cloud side and customer side.
The cloud side of kubernetes consists of the Kubernetes API and the master node which communicates and keeps in sync with the customer side. It also allows us to define how to run our workloads.
The customer side is the part users interact with if they decide to include kubernetes in their project. It consists of worker nodes and a very important part, kubelet which is reponsible for scheduling and making sure that the apps stay running healthily within the worker nodes. Each worker node has one kubelet service.
The basic structure of a kubernetes cluster is a bunch of nodes known as worker nodes on the customer side which run pods, a small logical unit which runs the containers for our applications on the worker nodes, and each pod can contain multiple containers depending on if the services are tightly coupled to be deployed on the same pod or loosely coupled to be deployed on different pods.
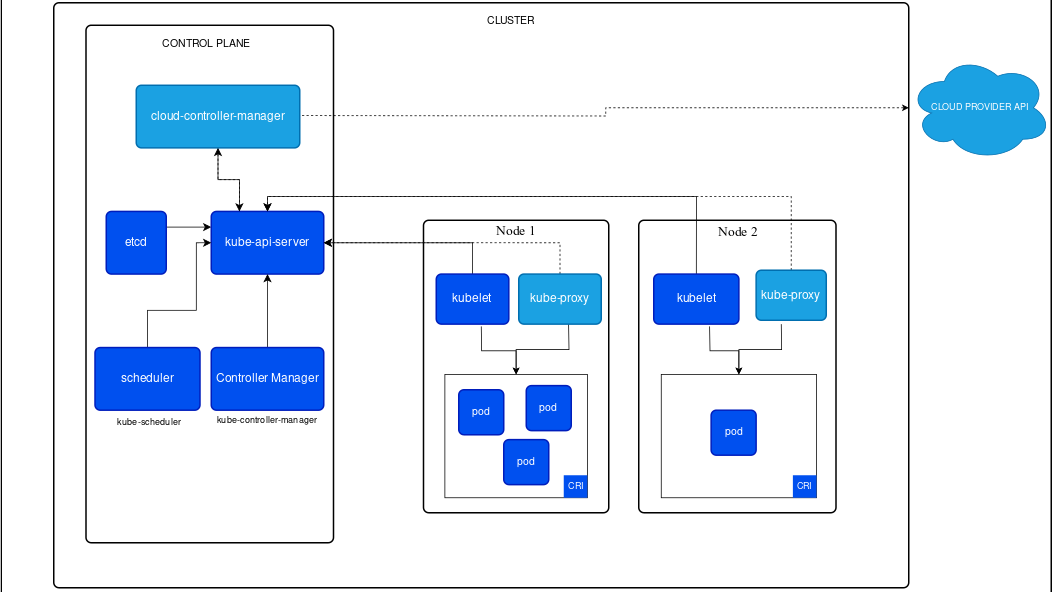
Kubernetes Components –
- API server – It is a component of kubernetes control plane that exposes the Kubernetes API.
- Scheduler – It assigns newly created pods to nodes based on resource availability, constraints, and workload requirements.
- Controller Manager – It manages various control loops that regulate the state of the cluster.
- etcd – It is a key-value store which stores cluster’s configuration data, state and metadata.
- Kubelet – They run on each node and ensure that node’s containers run healthily based on the pod’s specifications.
- Kube Proxy – It mantains the network rules and performs packet forwarding for pods on the node.
Now that we know of the different components that make up kuberenetes architecture, we should get to know the way in which we can use these components to take advantage of the services provided by kubernetes.
Kubernetes allows us to access these components through the use of YAML files. (Fun Fact: YAML stands for YAML ain’t markup language, this is the example of a recursive acronym).
Types of Resources –
There are many kinds of resources defined by Yaml file –
- Pod
- Deployment
- Service
- ConfigMap
- Secret
Pod Resource –
Below is an example of a Pod resource file –
# A sample yaml file of kind pod

apiVersion: v1
kind: Pod
metadata:
  name: my-pod
  labels:
    app: my-app
spec:
  containers:
  - name: my-container
    image: nginx:latest
    ports:
    - containerPort: 80
As you can see in this yaml file, we have specified the kind as pod meaning this yaml file is for configuring a single pod.
Let’s break down the fields in this file –
apiVersion: Specifies the version of the Kubernetes API being used. In this case, it’sv1.kind: Specifies the Kubernetes resource type. Here, it’s aPod.metadata: Contains metadata about the Pod, such as its name and labels.name: Specifies the name of the Pod.labels: Specifies labels for the Pod, which can be used for grouping and selecting Pods.
spec: Specifies the specification for the Pod, including its containers.containers: An array of containers to be run in the Pod.name: Specifies the name of the container.image: Specifies the Docker image to use for the container.ports: Specifies the ports to expose on the container.containerPort: Specifies the port number on which the container listens.
This is a basic example of how a yaml file would look like in a project.
Deployment Resource –
Now that you have seen this pod resource type, do you think it addresss all the issues an application may face like deployment, scalability and flexibility?
The answer to this question is NO.
This resource only addresses the deployment issue but we still need to make the application scalable and flexible.
For this, kubernetes defines another resource type known as Deployment.
This is an abstract resource which allows us to achieve the desired state for our application. Through this we can specify the number of pods we need replicate and maintain at all times. This means, if a certain pod dies due to a reason, it will automatically create a new pod in order to replace this dead pod.
Through deployment resource, we can also specify the strategy for rolling out our applications thus making our application scalable and flexible.
Here is a basic Deployment resource file, –
# A sample yaml file of kind deployment

apiVersion: apps/v1
kind: Deployment
metadata:
  name: my-deployment
spec:
  replicas: 3
  selector:
    matchLabels:
      app: my-app
  template:
    metadata:
      labels:
        app: my-app
    spec:
      containers:
      - name: my-container
        image: nginx:latest
        ports:
        - containerPort: 80
  strategy:
    type: RollingUpdate
    rollingUpdate:
      maxSurge: 1
In this, we can see the kind as Deployment, therefore this is a Deployment resource type.
Now I will define all the new fields which can be seen in our Deployment file –
apiVersion: Specifies the version of the Kubernetes API being used (apps/v1for Deployments).kind: Specifies the Kubernetes resource type (Deployment).metadata: Contains metadata about the Deployment, such as its name.spec: Specifies the specification for the Deployment.replicas: Specifies the desired number of replicas (instances) of the application to run (in this case, 3 replicas).selector: Specifies the labels used to select the Pods to manage.matchLabels: Specifies the labels that Pods must have to be managed by this Deployment.
template: Specifies the template for creating Pods managed by this Deployment.metadata: Contains metadata for the Pods.labels: Specifies the labels to apply to Pods created from this template.
spec: Specifies the specification for the Pods.containers: Specifies the containers to run in the Pods.name: Specifies the name of the container.image: Specifies the Docker image to use for the container.ports: Specifies the ports to expose on the container.containerPort: Specifies the port number on which the container listens.
strategy: Specifies the deployment strategy.type: Specifies the type of deployment strategy (RollingUpdate).rollingUpdate: Specifies parameters for the rolling update strategy.maxSurge: Specifies the maximum number of additional Pods that can be created during the rolling update.
Service Resource –
There is one problem with the setup till now, that is the ability to access these deployed pods.
After deployment, each of these pods arte assigned an internal ip address which needs to be hit in order for us to access these pods. But the problem is, these ips are not static and can change with subject to availability. Here kubernetes provides us with a solution using a resource known as Service which can group a set of pods or deployments together and assign it a static ip allowing easier access.
Services are of many types –
- ClusterIP – Default type. It provides the Service an internal ip through it can be accessed.
- NodePort – Exposes the service on each node’s ip at a static port.
- LoadBalancer – Exposes the service externally using a cloud provider’s load balancer
Below we observe an example of NodePort service type –
# A sample yaml file of kind service

apiVersion: v1
kind: Service
metadata:
  name: my-service
spec:
  selector:
    app: my-app
  ports:
    - protocol: TCP
      port: 80
      targetPort: 8080
  type: NodePort
You can observe that the kind of yaml file is Service and the type specified in the spec is NodePort.
apiVersion: Specifies the Kubernetes API version being used.kind: Specifies the type of Kubernetes resource, which in this case is a Service.metadata: Contains information about the Service, such as its name.spec: Defines the specification for the Service.selector: Specifies which Pods the Service should target. In this case, it targets Pods labeled withapp: my-app.ports: Specifies the ports that the Service will listen on and how it will route traffic to the target Pods.protocol: Specifies the protocol used for the port (e.g., TCP, UDP).port: Specifies the port on which the Service will listen.targetPort: Specifies the port on the Pods to which the Service will forward traffic.
In this example, since the selector selects pods with the label app: my-app, the pods we created in the deployment files will be selected and grouped together under this service my-service.
Now we can take advantage of another in-built service of kubernetes, kubeDNS to directly access the pods using the service name, since the DNS service resolves it to the pods ip address.
This is very useful when buiding microservices as you would often find the need to call other services present in the cluster.
Ingress Resource –
Ingress is an API object used to manage external access to the services within the cluster. It allows you to define the routing rules for the traffic to different services based on the endpoints. It supports HTTP and HTTPS.
An example of Ingress can be seen below –
# This is a sample yaml file of kind Ingress

apiVersion: networking.k8s.io/v1
kind: Ingress
metadata:
  name: my-ingress
spec:
  rules:
  - host: example.com
    http:
      paths:
      - path: /app
        pathType: Prefix
        backend:
          service:
            name: my-service
            port:
              number: 80
apiVersion: Specifies the Kubernetes API version being used, which in this case isnetworking.k8s.io/v1.kind: Specifies the type of Kubernetes resource, which isIngress.metadata: Contains information about the Ingress resource, such as its name.spec: Defines the specification for the Ingress.rules: Specifies a list of host rules and their associated paths.host: Specifies the hostname for which the Ingress rules apply. In this example, it’s set toexample.com.http: Specifies that this rule is for HTTP traffic.paths: Specifies a list of paths and how to route traffic for each path.path: Specifies the URL path to match. In this case, it’s/app.pathType: Specifies the type of matching for the path, which can bePrefix,Exact, orImplementationSpecific. Here, it’s set toPrefix, meaning that any path that starts with/appwill match.backend: Specifies the backend service to forward matching requests to.service: Specifies the name of the Kubernetes Service to forward traffic to, which ismy-servicein this example.port: Specifies the port number of the backend service to forward traffic to. Here, it’s set to80.
An ingress does not actually perform any routing itself, you need an Ingress Controller to interpret the ingress object and route the traffic. Popular controllers include – NGINX Ingress Controller, Traefik, HAProxy Ingress.
ConfigMap –
Sometimes when you are developing an application, there are certain values that you do not know during development and can only be defined during runtime. These variables are environment variables which contain important configuration data for the application api key, datable url etc.
To manage these variables efficiently, kubernetes provides a way in a resource known as ConfigMap which stores these environment variables.
Example of ConfigMap –
# This is a sample yaml file of kind ConfigMap
apiVersion: v1
kind: ConfigMap
metadata:
name: my-configmap
data:
DATABASE_URL: "mysql://username:password@hostname:3306/mydatabase"
API_KEY: "abcdef123456"
LOG_LEVEL: "DEBUG"
apiVersion: Specifies the Kubernetes API version being used, which isv1for ConfigMaps.kind: Specifies the type of Kubernetes resource, which isConfigMap.metadata: Contains information about the ConfigMap, such as its name.data: Contains key-value pairs representing the configuration data.- Each key-value pair represents a configuration entry.
- The keys represent the names of configuration parameters.
- The values represent the corresponding configuration values.
As you can see, the environment variables are stored in key value pairs making it easy to understand their values. In this way, we can easily change the values of environment variables whenever we want.
Secret Resource –
There are certain variables which contain sensitive data like admin username and password which cannot be leaked to anyone. These cannot be stored in a config map, but a different resource known as Secret. This ensures the protection of this sensitive information.
Below is the a Secret Resource File –
# This is a sample yaml file of kind Secret

apiVersion: v1
kind: Secret
metadata:
  name: my-secret
type: Opaque
data:
  username: YWRtaW4=
  password: MWYyZDFlMmU2N2Rm
apiVersion: Specifies the Kubernetes API version being used, which isv1for Secrets.kind: Specifies the type of Kubernetes resource, which isSecret.metadata: Contains information about the Secret, such as its name.type: Specifies the type of data stored in the Secret. In this case, it’sOpaque, which means arbitrary data.data: Contains the actual secret data, encoded as base64.- Each key-value pair represents a piece of sensitive information.
- The values are base64-encoded representations of the actual secret data.
These values are base-64 encoded in kubernetes storage which allows for secrecy.
Now we have learned about a lot of resources, it is time to learn about a tool in kubernetes which can use these yaml files to spin up pods in the cluster.
Kubectl: A command-line tool
kubectl is a CLI tool provided by kubernetes in order to interact with the cluster and make changes in it.
It allows users to perform various operations on Kubernetes resources, such as creating, updating, deleting, and managing pods, deployments, services, and other Kubernetes objects.
When you make a project and want to deploy it on a kubernetes cluster using the yaml files decribed in the previous section, by convention you make a manifestsdirectory in the root path of your project and write all the yaml files in there.
After which, using a command line, you enter the manifests folder and write the command –
kubectl apply -f ./
kubectl apply as decribed above applys the resources according to the configuration yaml files.
The -f flag allows you to specify the directory where you want the kubectl apply to pick configuration files from and ./ means the present directory which is the manifests directory.
You can also write something like this –
kubectl apply -f file1.yaml -f file2.yaml which applies configurations from both files.
The kubectl get command is very useful if you want to get some information on a particular resource, for example node or deployment or pod.
So command would look like this –
kubectl get resource-name -o wide
This gets all the resources of this type in your cluser. The -o wide flag tells kubectl to output additional information about the resource in a wide format.
If you want to delete the resources you created with the configuration files, you can type –
kubectl delete resource-name to delete the resource completely.
kubectl scale command allows you to scale a deployment like –
kubectl scale --replicas=3 deployment/my-deployment
This makes 3 replicas of a deployment knows as my-deployment.
Another very used command is kubectl exec which essentially just executes any command you want inside a container in the cluster.
For example –
kubectl exec -it my-pod -- /bin/bash executes a command /bin/bash inside a pod, my-pod in interactive mode specified by the -it flag.
With this, we end the article on Kubernetes, hope you learnt a lot and make sure to apply it in your future projects.

Be First to Comment